My Camera Set Up (a Behind the Scenes Tour!)
If you've ever wondered how you should have your camera set up, then you are in the perfect place!
Today I'm going to give you a behind the scenes tour of my own camera set up.
Now be sure to watch right until the end, because I'm going to share with you how I would set my camera up if you're just starting out and not yet shooting in manual.
As usual, there are two ways to enjoy this information packed post - watch the video (which I recommend as it’s better!) or scroll down to read instead.
Plus, don’t forget to download the free manual settings cheat sheet I have for you - that way you can also get help with your aperture, shutter speed and ISO settings, which of course will be variable depending on what you shoot….
Got that? Great! Then let’s dive in…..

Let's just start at the beginning and work our way along!
#1 Shooting Mode, Aperture, ISO & Shutter Speed
So the first setting here is M for manual mode. So I pretty much always shoot in manual mode! You may occasionally find me in aperture priority mode, if I have to, but most of the time, I like to shoot in manual, as that gives me more control over my camera settings and which most importantly, how my image is going to look.
The next one here is shutter speed, then aperture and then ISO, which are variable based on whatever I'm photographing.
(I do have a video which shows you different example photos with camera settings, and why I chose them, so do check that out too, or, of course, download the free cheat sheet!)

The next one along is exposure compensation, but I don't need to worry about that if I'm shooting in manual mode so I can leave that alone, and if I don't have any flash, I can leave that one alone too.
#2 Custom Controls
Next up is custom controls, and I do actually have this set slightly differently because I have this button here that I have set to start my autofocus. (This is often called back button focusing)

#3 Picture Style Settings
Next is Picture Style Settings. Now I have this at neutral, but if you shoot in raw, then this is irrelevant because it's only going to apply that to your JPEG settings!

#4 - White Balance Setting
This is your white balance setting. I have that set at custom, or I'm going to use Kelvin.
Not every camera has Kelvin, and if you don't, then you obviously won't see that there! But for me, I'll either being custom if I'm using a gray card or a expodisc or other white balance tool, and I'll use Kelvin if I'm not.
You can set this white balance shift bracket so it makes it so you can get three different white balances, but I never use this, as I prefer to get it right in camera :)

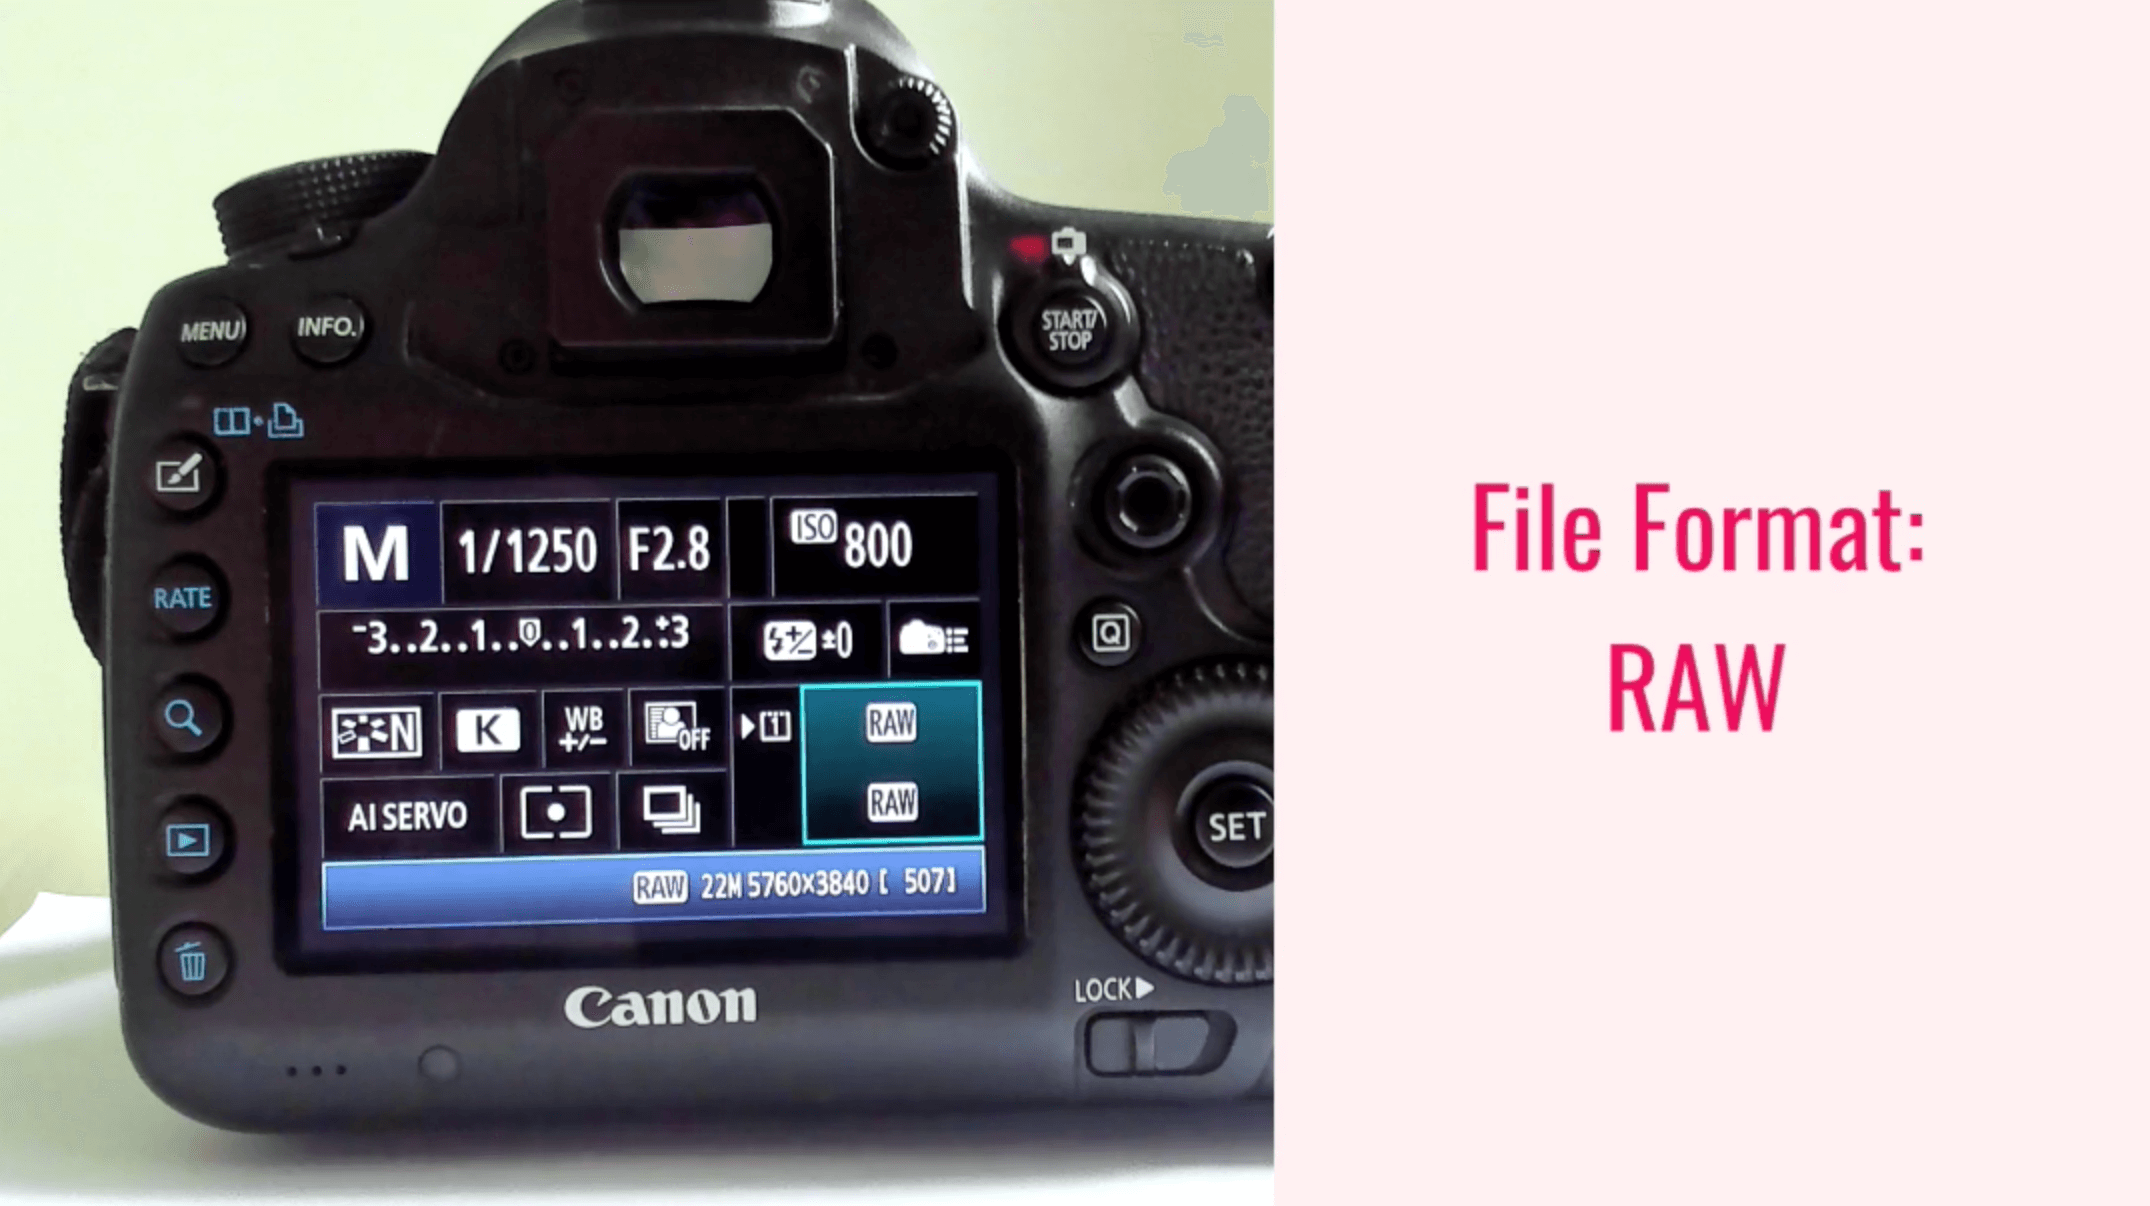
#5 - File Format
The next one is the File Format: in other words, what you're going to shoot in, either JPEG or RAW.
I do recommend that you shoot in raw, so that you can get that control when editing.
RAW gives you SO much more leeway in your editing program: you can bring back blown highlights a little bit more easily, you can bring up shadows more easily, fix your exposure, and also fix the white balance if you didn’t get that correct. when shooting. So it gives you so much more latitude when you're editing, which is why I always make sure that I'm shooting in RAW!
#6 Auto Focus Mode
So this next one here is your AF mode and you have three different modes, Al servo, AI focus and One Shot.
I always either use one shot or Al Servo. Now, if you're shooting a Nikon, you have a very similar setup. They're just called something different: Al Servo it was called AF-C, and One Shot is called AF-S. It's the same thing but it is a just a different name.
You can read more about focus in this post How to Take Sharp Photos

#7 Spot Metering
Let’s move along to metering.
I always use spot metering, because again, that gives me so much more control over my exposure and I can expose for different parts of the scene.

#8 - Burst Mode
Burst Mode is when you can choose to take a burst of photos at any one time - really useful for capturing the perfect moment in action shots. I usually have that low speed continuous.
This uses up a lot of battery, and it can take time to write to your memory card, so just be aware of that!

Camera Set Up For Beginners!
If you are just getting started in photography, I do actually recommend a different camera set up because mine has set up for everything to be manual. I want to take control of all of my settings, which is definitely something that I recommend that you work towards too!
But if you're not there yet, here's how I would set up your camera:

SHOOTING MODE: APERTURE PRIORITY
So if you are on auto, here's what I would like you to do and move to like you to change to aperture priority mode. You'll find it on the top dial.
You can choose the aperture yourself and the camera will choose the shutter speed, and the ISO for you. Now, you'll see that here that there's no longer a shutter speed noted because the camera's going to choose it for you. My ISO is also on auto, so only one you are choosing is aperture.
Now eventually you're going to choose the ISO yourself, then the shutter speed in full manual mode. So manual mode is your final destination - don't stop before you get there and just take baby steps until you get to that point!
Don’t forget to download the free manual settings cheat sheet to help you!
EXPOSURE COMPENSATION
You can also use exposure compensation if your image is too dark or too light.
If the images are too dark, you can the exposure compensation up and that's going to add exposure. In other words, make your image brighter, or you can move this down if your image is too bright, and that's going to make it darker.
PICTURE SETTINGS & FILE FORMAT
For picture settings, I would have this in neutral, because I would recommend that you switch to JPEG unless you are editing your photos yourself. Then as soon as you start editing, I recommend switching to the RAW file format.
WHITE BALANCE
Now, white balance, you can have that set to auto, but when you feel ready, you can start to use any of these presets here, or if you feel brave enough, you can start to learn how to do your own custom white balance.
METERING
And for your metering, I would change from spot metering to evaluative / matrix metering. Again, you're going to learn how to use spot metering in the future, this is just to get you started.

FOCUS MODE:
And with regard to the focus, if you're just getting started, you can use the auto function there, AL Focus. And again, you will have an option for that if you use Nikon which is called Dynamic Area)
So that's it for this week! Thank you so much for being here and I'll see you again soon. Bye for now!